1.环境准备
在华为云上申请3台ECS虚机服务器,临时测试使用,建议按需付费申请。选择VPC为192.168.0.0/16网段,将在这三个节点部署v1.23.1最新版本Kubernetes集群。为何要选三个节点?是因为准备实验ceph作为后端分布式存储,至少需要三个节点起,且需要一个裸盘作为ceph存储数据盘,所以在华为云上给每个ECS配置一个额外的100G空EVS块存储,具体信息如下表;选择flannel作为底层网络插件。
| 角色 | OS | 节点name | 存储 | IP | docker version | kubelet version | kubeadm version | kubectl version | network |
|---|
| master | Centos7.9 | master | 40G+100G(数据盘) | 192.168.0.11 | Docker 20.10.8 | V1.23.1 | V1.23.1 | V1.23.1 | flannel |
| master | Centos7.9 | node1 | 40G+100G(数据盘) | 192.168.0.23 | Docker 20.10.8 | V1.23.1 | V1.23.1 | V1.23.1 | flannel |
| master | Centos7.9 | node2 | 40G+100G(数据盘) | 192.168.0.51 | Docker 20.10.8 | V1.23.1 | V1.23.1 | V1.23.1 | flannel |
表1:环境信息,可左右滑动查看全部信息。
注: Kubernetes从v.1.20版本起默认移除 docker 的依赖,如果宿主机上安装了 docker 和 containerd,将优先使用 docker 作为容器运行引擎,如果宿主机上未安装 docker 只安装了 containerd,将使用 containerd 作为容器运行引擎。为减少学习成本,这里选择安装docker。
2.配置安全组
无论华为云、腾讯云还是阿里云、AWS、Azure在配置生成VM虚机都会默认选择安全组,对虚机的网络进行简单防护,即通过安全组限制哪些端口放开,哪些端口可访问,K8s在安装过程中一些组件是通过Service、POD提供网络服务的,是需要开启对应的端口的,否则服务会异常无法部署成功。
当然如果是直接采用物理服务器,或者VMware虚拟机则不需要考虑。默认需要开启的网络端口如下:
2.1 入站规则
master 节点端口检查:
| Protocol | Direction | Port Range | Purpose |
|---|
| TCP | Inbound | 6443 | Kube-apiserver |
| TCP | Inbound | 2379-2380 | Etcd API |
| TCP | Inbound | 10250 | Kubelet API |
| TCP | Inbound | 10251 | Kube-scheduler |
| TCP | Inbound | 10252 | Kube-controller-manager |
node1、node2 节点端口检查:
| Protocol | Direction | Port Range | Purpose |
|---|
| TCP | Inbound | 10250 | Kubelet api |
| TCP | Inbound | 30000-32767 | NodePort Service |
2.2 出站规则
| 协议规则 | 端口 | 来源 | 策略 |
|---|
| ALL | ALL | 0.0.0.0/0 | 允许 |
3. 配置基础信息
给所有节点提前安装准备好基础软件。
3.1修改主机信息
 1
 2
 3
 4
 5
 6
 7
 8
 9
10
11
12
13
14
15
16
17
18
19
20
21
22
23
24
25
26
27
28
29
30
31
32
33
34
35
36
37
38
39
40
41
42
43
44
45
| # 分别在三个主机上设置主机名,重启生效
hostnamectl set-hostname master
reboot
hostnamectl set-hostname node1
reboot
hostnamectl set-hostname node2
reboot
# 三个主机上同步时间
systemctl restart chronyd
#三个主机上配置hosts地址DNS解析地址
cat >> /etc/hosts << EOF
192.168.0.11 master
192.168.0.23 node1
192.168.0.51 node2
EOF
# 设置三台机子间无密码访问,在主节点生成密钥,拷贝至另外两台,则可在master直接登录node1和node2
# 如果想在node1和node2访问节点,也分别执行下面语句生成密钥并拷贝
ssh-keygen -t rsa
ssh-copy-id root@node1
ssh-copy-id root@node2
# 关闭防火墙和iptables
systemctl stop firewalld.service
systemctl disable firewalld.service
systemctl stop iptables.service
systemctl disable iptables.service
# 关闭SELinux
setenforce 0
sed -i 's/^SELINUX=.*/SELINUX=disabled/' /etc/selinux/config
# 关闭swap
swapoff -a
sed -i 's/.*swap.*/#&/' /etc/fstab
# 配置内核参数:
cat > /etc/sysctl.d/k8s.conf <<EOF
net.bridge.bridge-nf-call-ip6tables = 1
net.bridge.bridge-nf-call-iptables = 1
EOF
|
3.2 修改yum源
1
2
3
4
| sudo mkdir /etc/yum.repos.d/bak && mv /etc/yum.repos.d/*.repo /etc/yum.repos.d/bak
wget -O /etc/yum.repos.d/CentOS-Base.repo https://repo.huaweicloud.com/repository/conf/CentOS-7-reg.repo
sudo yum clean all
sudo yum makecache fast
|
3.3 安装基础软件
1
2
3
4
5
| #安装自动补全软件与基础依赖包
sudo yum install -y bash-completion
source /etc/profile.d/bash_completion.sh
sudo yum remove docker docker-common docker-selinux docker-engine
sudo yum install -y yum-utils device-mapper-persistent-data lvm2
|
4.安装docker
给所有节点安装Docker、配置镜像加速。
4.1 安装Docker软件
 1
 2
 3
 4
 5
 6
 7
 8
 9
10
11
| #补充docker yum源
wget -O /etc/yum.repos.d/docker-ce.repo https://repo.huaweicloud.com/docker-ce/linux/centos/docker-ce.repo
sudo sed -i 's+download.docker.com+repo.huaweicloud.com/docker-ce+' /etc/yum.repos.d/docker-ce.repo
sudo yum makecache fast
#安装最新版本Docker 20.10.8,安装前可使用yum list docker-ce --showduplicates |sort -r查看yum源中的docker列表
sudo yum install -y docker-ce
sudo systemctl enable docker
sudo systemctl start docker
sudo systemctl status docker
docker --version
|
4.2 Docker镜像加速与设置cgroup
 1
 2
 3
 4
 5
 6
 7
 8
 9
10
11
12
13
14
| #配置/etc/docker/daemon.json文件,对镜像加速,注意换成自己镜像地址
sudo tee /etc/docker/daemon.json <<-'EOF'
{
"registry-mirrors": ["https://e2660ea6dc2b4a16a3ae382f8d227beb.mirror.swr.myhuaweicloud.com"],
"exec-opts": ["native.cgroupdriver=systemd"]
}
EOF
# 上面配置"exec-opts": ["native.cgroupdriver=systemd"],即是将docker使用systemd作为cgroupdriver,否则kubelet可能启动不正常
# 重启docker
sudo systemctl daemon-reload
sudo systemctl restart docker
sudo systemctl status docker
|
5. 安装Kubernets集群
首先对Master节点安装Kubernetes,然后将Node1、Node2加入集群。
5.1 安装Kubeadm
分别在三个节点上安装kubeadm,kubelet,kubectl工具。
 1
 2
 3
 4
 5
 6
 7
 8
 9
10
11
12
13
14
15
16
17
18
19
20
21
22
23
24
25
26
27
28
29
30
31
32
33
34
35
36
37
38
39
40
41
42
43
44
45
46
47
48
49
50
51
52
53
54
55
56
57
58
59
60
61
| # 所有节点上添加阿里的Kubernetes源
cat >> /etc/yum.repos.d/kubernetes.repo <<EOF
[kubernetes]
name=Kubernetes Repository
baseurl=https://mirrors.aliyun.com/kubernetes/yum/repos/kubernetes-el7-x86_64/
gpgcheck=1
gpgkey=https://mirrors.aliyun.com/kubernetes/yum/doc/rpm-package-key.gpg https://mirrors.aliyun.com/kubernetes/yum/doc/yum-key.gpg
EOF
sudo yum clean all
sudo yum makecache fast
#分别查询1.23.1包是否在yum源里
yum list kubelet --showduplicates | sort -r
yum list kubectl --showduplicates | sort -r
yum list kubeadm --showduplicates | sort -r
#安装kubeadm,会自动安装好kubectl,kubelet
sudo yum install -y kubeadm
sudo systemctl enable kubelet
sudo systemctl start kubelet
kubeadm version
kubectl version
kubelet --version
#kubectl命令补全
cd
echo "source <(kubectl completion bash)" >> ~/.bash_profile
source .bash_profile
# master查看所需的镜像
sudo kubeadm config images list
------------------------------------------------
#查询的需要如下镜像
k8s.gcr.io/kube-apiserver:v1.23.1
k8s.gcr.io/kube-controller-manager:v1.23.1
k8s.gcr.io/kube-scheduler:v1.23.1
k8s.gcr.io/kube-proxy:v1.23.1
k8s.gcr.io/pause:3.6
k8s.gcr.io/etcd:3.5.1-0
k8s.gcr.io/coredns/coredns:v1.8.6
-------------------------------------------------
# 由于kubeadm依赖国外的k8s.gcr.io的镜像,国内被墙所以这边的解决方案是下载国内的镜像重新打tag的方式
docker pull registry.cn-hangzhou.aliyuncs.com/google_containers/kube-apiserver:v1.23.1
docker pull registry.cn-hangzhou.aliyuncs.com/google_containers/kube-controller-manager:v1.23.1
docker pull registry.cn-hangzhou.aliyuncs.com/google_containers/kube-scheduler:v1.23.1
docker pull registry.cn-hangzhou.aliyuncs.com/google_containers/kube-proxy:v1.23.1
docker pull registry.cn-hangzhou.aliyuncs.com/google_containers/pause:3.6
docker pull registry.cn-hangzhou.aliyuncs.com/google_containers/etcd:3.5.1-0
docker pull registry.cn-hangzhou.aliyuncs.com/google_containers/coredns:v1.8.6
# 修改tag回k8s.gcr.io(重命名)
docker tag registry.cn-hangzhou.aliyuncs.com/google_containers/kube-apiserver:v1.23.1 k8s.gcr.io/kube-apiserver:v1.23.1
docker tag registry.cn-hangzhou.aliyuncs.com/google_containers/kube-controller-manager:v1.23.1 k8s.gcr.io/kube-controller-manager:v1.23.1
docker tag registry.cn-hangzhou.aliyuncs.com/google_containers/kube-scheduler:v1.23.1 k8s.gcr.io/kube-scheduler:v1.23.1
docker tag registry.cn-hangzhou.aliyuncs.com/google_containers/kube-proxy:v1.23.1 k8s.gcr.io/kube-proxy:v1.23.1
docker tag registry.cn-hangzhou.aliyuncs.com/google_containers/pause:3.6 k8s.gcr.io/pause:3.6
docker tag registry.cn-hangzhou.aliyuncs.com/google_containers/etcd:3.5.1-0 k8s.gcr.io/etcd:3.5.1-0
docker tag registry.cn-hangzhou.aliyuncs.com/google_containers/coredns:v1.8.6 k8s.gcr.io/coredns/coredns:v1.8.6
|
5.2 Master节点初始化
1
2
3
4
5
6
| # master执行init初始化,指定pod网络为10.244.0.0/16,服务网络为10.1.0.0/16,这两个均为集群内部网络,API-server为master节点IP(从华为云上VPC中分配的)
kubeadm init \
--kubernetes-version=1.23.1 \
--apiserver-advertise-address=192.168.0.11 \
--service-cidr=10.1.0.0/16 \
--pod-network-cidr=10.244.0.0/16
|
初始化安装过程打印如下:
 1
 2
 3
 4
 5
 6
 7
 8
 9
10
11
12
13
14
15
16
17
18
19
20
21
22
23
24
25
26
27
28
29
30
31
32
33
34
35
36
37
38
39
40
41
42
43
44
45
46
47
48
49
50
51
52
53
54
55
56
57
58
59
60
61
62
63
64
65
66
67
68
69
70
71
72
| [init] Using Kubernetes version: v1.23.1
[preflight] Running pre-flight checks
[preflight] Pulling images required for setting up a Kubernetes cluster
[preflight] This might take a minute or two, depending on the speed of your internet connection
[preflight] You can also perform this action in beforehand using 'kubeadm config images pull'
[certs] Using certificateDir folder "/etc/kubernetes/pki"
[certs] Generating "ca" certificate and key
[certs] Generating "apiserver" certificate and key
[certs] apiserver serving cert is signed for DNS names [kubernetes kubernetes.default kubernetes.default.svc kubernetes.default.svc.cluster.lo cal master] and IPs [10.1.0.1 192.168.0.46]
[certs] Generating "apiserver-kubelet-client" certificate and key
[certs] Generating "front-proxy-ca" certificate and key
[certs] Generating "front-proxy-client" certificate and key
[certs] Generating "etcd/ca" certificate and key
[certs] Generating "etcd/server" certificate and key
[certs] etcd/server serving cert is signed for DNS names [localhost master] and IPs [192.168.0.46 127.0.0.1 ::1]
[certs] Generating "etcd/peer" certificate and key
[certs] etcd/peer serving cert is signed for DNS names [localhost master] and IPs [192.168.0.46 127.0.0.1 ::1]
[certs] Generating "etcd/healthcheck-client" certificate and key
[certs] Generating "apiserver-etcd-client" certificate and key
[certs] Generating "sa" key and public key
[kubeconfig] Using kubeconfig folder "/etc/kubernetes"
[kubeconfig] Writing "admin.conf" kubeconfig file
[kubeconfig] Writing "kubelet.conf" kubeconfig file
[kubeconfig] Writing "controller-manager.conf" kubeconfig file
[kubeconfig] Writing "scheduler.conf" kubeconfig file
[kubelet-start] Writing kubelet environment file with flags to file "/var/lib/kubelet/kubeadm-flags.env"
[kubelet-start] Writing kubelet configuration to file "/var/lib/kubelet/config.yaml"
[kubelet-start] Starting the kubelet
[control-plane] Using manifest folder "/etc/kubernetes/manifests"
[control-plane] Creating static Pod manifest for "kube-apiserver"
[control-plane] Creating static Pod manifest for "kube-controller-manager"
[control-plane] Creating static Pod manifest for "kube-scheduler"
[etcd] Creating static Pod manifest for local etcd in "/etc/kubernetes/manifests"
[wait-control-plane] Waiting for the kubelet to boot up the control plane as static Pods from directory "/etc/kubernetes/manifests". This can take up to 4m0s
[apiclient] All control plane components are healthy after 5.502543 seconds
[upload-config] Storing the configuration used in ConfigMap "kubeadm-config" in the "kube-system" Namespace
[kubelet] Creating a ConfigMap "kubelet-config-1.23" in namespace kube-system with the configuration for the kubelets in the cluster
NOTE: The "kubelet-config-1.23" naming of the kubelet ConfigMap is deprecated. Once the UnversionedKubeletConfigMap feature gate graduates to Beta the default name will become just "kubelet-config". Kubeadm upgrade will handle this transition transparently.
[upload-certs] Skipping phase. Please see --upload-certs
[mark-control-plane] Marking the node master as control-plane by adding the labels: [node-role.kubernetes.io/master(deprecated) node-role.kubernetes.io/control-plane node.kubernetes.io/exclude-from-external-load-balancers]
[mark-control-plane] Marking the node master as control-plane by adding the taints [node-role.kubernetes.io/master:NoSchedule]
[bootstrap-token] Using token: b2n16t.n6filxh3vc6byr7c
[bootstrap-token] Configuring bootstrap tokens, cluster-info ConfigMap, RBAC Roles
[bootstrap-token] configured RBAC rules to allow Node Bootstrap tokens to get nodes
[bootstrap-token] configured RBAC rules to allow Node Bootstrap tokens to post CSRs in order for nodes to get long term certificate credentials
[bootstrap-token] configured RBAC rules to allow the csrapprover controller automatically approve CSRs from a Node Bootstrap Token
[bootstrap-token] configured RBAC rules to allow certificate rotation for all node client certificates in the cluster
[bootstrap-token] Creating the "cluster-info" ConfigMap in the "kube-public" namespace
[kubelet-finalize] Updating "/etc/kubernetes/kubelet.conf" to point to a rotatable kubelet client certificate and key
[addons] Applied essential addon: CoreDNS
[addons] Applied essential addon: kube-proxy
Your Kubernetes control-plane has initialized successfully!
To start using your cluster, you need to run the following as a regular user:
mkdir -p $HOME/.kube
sudo cp -i /etc/kubernetes/admin.conf $HOME/.kube/config
sudo chown $(id -u):$(id -g) $HOME/.kube/config
Alternatively, if you are the root user, you can run:
export KUBECONFIG=/etc/kubernetes/admin.conf
You should now deploy a pod network to the cluster.
Run "kubectl apply -f [podnetwork].yaml" with one of the options listed at:
https://kubernetes.io/docs/concepts/cluster-administration/addons/
Then you can join any number of worker nodes by running the following on each as root:
kubeadm join 192.168.0.46:6443 --token b2n16t.n6filxh3vc6byr7c \
--discovery-token-ca-cert-hash sha256:f4d103707658df3fa7a8dc95a59719f362cd42edb40c8ebc5ae19d53655813d1
|
根据提示,将配置拷贝至.kube目录下
1
2
3
| mkdir -p $HOME/.kube
sudo cp -i /etc/kubernetes/admin.conf $HOME/.kube/config
sudo chown $(id -u):$(id -g) $HOME/.kube/config
|
应用网络插件flannel
1
| kubectl apply -f https://raw.githubusercontent.com/coreos/flannel/master/Documentation/kube-flannel.yml
|
5.3 节点加入集群
分别在两个节点上执行kubectl join加入集群。
 1
 2
 3
 4
 5
 6
 7
 8
 9
10
11
12
13
14
15
16
17
| [root@node1 ~]# kubeadm join 192.168.0.46:6443 --token b2n16t.n6filxh3vc6byr7c \
> --discovery-token-ca-cert-hash sha256:f4d103707658df3fa7a8dc95a59719f362cd42edb40c8ebc5ae19d53655813d1
[preflight] Running pre-flight checks
[preflight] Reading configuration from the cluster...
[preflight] FYI: You can look at this config file with 'kubectl -n kube-system get cm kubeadm-config -o yaml'
[kubelet-start] Writing kubelet configuration to file "/var/lib/kubelet/config.yaml"
[kubelet-start] Writing kubelet environment file with flags to file "/var/lib/kubelet/kubeadm-flags.env"
[kubelet-start] Starting the kubelet
[kubelet-start] Waiting for the kubelet to perform the TLS Bootstrap...
This node has joined the cluster:
* Certificate signing request was sent to apiserver and a response was received.
* The Kubelet was informed of the new secure connection details.
Run 'kubectl get nodes' on the control-plane to see this node join the cluster.
[root@node1 ~]#
|
如果想在节点上执行kubectl命令,则需要将master节点配置拷贝至节点的$HOME/.kube目录下。
 1
 2
 3
 4
 5
 6
 7
 8
 9
10
11
12
13
14
15
16
17
18
19
20
21
22
23
24
25
26
27
28
29
30
31
32
33
34
35
36
37
38
39
| #在节点上创建一个目录,即kubectl默认启动读取证书配置目录
[root@node1 ~]# mkdir -p $HOME/.kube
#在master节点将配置复制到node1节点
[root@master ~]# scp .kube/config root@node1:/root/.kube/
#可在node节点查看节点,组件,pod等状态
[root@node1 ~]# kubectl get nodes
NAME STATUS ROLES AGE VERSION
master Ready control-plane,master 43m v1.23.1
node1 Ready <none> 39m v1.23.1
node2 Ready <none> 39m v1.23.1
[root@node1 ~]# kubectl get ns
NAME STATUS AGE
default Active 43m
kube-node-lease Active 43m
kube-public Active 43m
kube-system Active 43m
[root@node1 ~]# kubectl get cs
Warning: v1 ComponentStatus is deprecated in v1.19+
NAME STATUS MESSAGE ERROR
scheduler Healthy ok
controller-manager Healthy ok
etcd-0 Healthy {"health":"true","reason":""}
[root@node1 ~]# kubectl get pods -nkube-system
NAME READY STATUS RESTARTS AGE
coredns-64897985d-bs6b9 1/1 Running 0 43m
coredns-64897985d-s2kml 1/1 Running 0 43m
etcd-master 1/1 Running 0 44m
kube-apiserver-master 1/1 Running 0 44m
kube-controller-manager-master 1/1 Running 0 44m
kube-flannel-ds-8jpd4 1/1 Running 0 39m
kube-flannel-ds-jlfzx 1/1 Running 0 39m
kube-flannel-ds-jztwk 1/1 Running 0 41m
kube-proxy-5lnr9 1/1 Running 0 39m
kube-proxy-thghs 1/1 Running 0 43m
kube-proxy-w7rhv 1/1 Running 0 39m
kube-scheduler-master 1/1 Running 0 44m
[root@node1 ~]#
|
5.4 安装ceph存储
我们通过rook来安装ceph存储,ceph要求至少三个节点,每个节点至少有一个裸盘。我们在申请ECS的时候加了一个100G的EVS块存储盘。
 1
 2
 3
 4
 5
 6
 7
 8
 9
10
| [root@master ~]# lsblk
NAME MAJ:MIN RM SIZE RO TYPE MOUNTPOINT
vda 253:0 0 40G 0 disk
└─vda1 253:1 0 40G 0 part /
vdb 253:16 0 100G 0 disk
[root@master ~]# lsblk -f
NAME FSTYPE LABEL UUID MOUNTPOINT
vda
└─vda1 ext4 b64c5c5d-9f6b-4754-9e1e-eaef91437f7a /
vdb
|
为了方便,可先到github把整个rook项目下载下来。
1
2
| yum install -y git
git clone https://github.com/rook/rook.git
|
确保系统内核支持rbd
1
2
3
4
5
6
| [root@master ~]# uname -r
3.10.0-1160.15.2.el7.x86_64
[root@master ~]# modprobe rbd
[root@master ~]# lsmod |grep rbd
rbd 102400 0
libceph 413696 1 rbd
|
因为我们只部署了3个节点,而ceph最低要求3个节点,pod默认不允许部署在master节点,为了ceph的pod能正常部署,我们提前将master节点的污点去掉,允许pod部署在master节点上。
1
| [root@master1 ~]# kubectl taint nodes --all node-role.kubernetes.io/master-
|
开始部署rook
1
2
3
4
5
| cd /root/rook/deploy/examples
kubectl apply -f crds.yaml -f common.yaml
kubectl apply -f operator.yaml #如果img下载不下来可提前pull到本地
kubectl apply -f cluster.yaml
kubectl get pods -n rook-ceph -o wide
|
根据提示会有很多image拉取不到,到aliyun上逐渐获取,需要在各个节点上执行,记录的几个镜像:
 1
 2
 3
 4
 5
 6
 7
 8
 9
10
11
12
13
14
|
docker pull registry.cn-hangzhou.aliyuncs.com/google_containers/rook/ceph:master
docker pull registry.cn-hangzhou.aliyuncs.com/google_containers/csi-node-driver-registrar:v2.3.0
docker pull registry.cn-hangzhou.aliyuncs.com/google_containers/csi-provisioner:v3.0.0
docker pull quay.io/cephcsi/cephcsi:v3.4.0
docker pull registry.cn-hangzhou.aliyuncs.com/google_containers/csi-attacher:v3.3.0
docker pull registry.cn-hangzhou.aliyuncs.com/google_containers/csi-snapshotter:v4.2.0
docker pull registry.cn-hangzhou.aliyuncs.com/google_containers/csi-resizer:v1.3.0

docker tag  registry.cn-hangzhou.aliyuncs.com/google_containers/csi-node-driver-registrar:v2.3.0 k8s.gcr.io/sig-storage/csi-node-driver-registrar:v2.3.0
docker tag registry.cn-hangzhou.aliyuncs.com/google_containers/csi-provisioner:v3.0.0 k8s.gcr.io/sig-storage/csi-provisioner:v3.0.0
docker tag registry.cn-hangzhou.aliyuncs.com/google_containers/csi-attacher:v3.3.0 k8s.gcr.io/sig-storage/csi-attacher:v3.3.0
docker tag registry.cn-hangzhou.aliyuncs.com/google_containers/csi-snapshotter:v4.2.0 k8s.gcr.io/sig-storage/csi-snapshotter:v4.2.0
docker tag registry.cn-hangzhou.aliyuncs.com/google_containers/csi-resizer:v1.3.0 k8s.gcr.io/sig-storage/csi-resizer:v1.3.0
|
镜像问题解决后查看namespace下的pod状态:
 1
 2
 3
 4
 5
 6
 7
 8
 9
10
11
12
13
14
15
16
17
18
19
20
21
22
23
24
25
26
27
28
29
30
31
32
33
34
35
| [root@master examples]# kubectl get pods -nrook-ceph
NAME READY STATUS RESTARTS AGE
csi-cephfsplugin-ct842 3/3 Running 0 25m
csi-cephfsplugin-cvb7f 3/3 Running 0 25m
csi-cephfsplugin-j5gbm 3/3 Running 0 25m
csi-cephfsplugin-provisioner-5c8b6d6f4-hhvjq 6/6 Running 0 25m
csi-cephfsplugin-provisioner-5c8b6d6f4-kr4n5 6/6 Running 0 25m
csi-rbdplugin-fcbk9 3/3 Running 0 25m
csi-rbdplugin-fpv8t 3/3 Running 0 25m
csi-rbdplugin-provisioner-8564cfd44-jkqrq 6/6 Running 0 25m
csi-rbdplugin-provisioner-8564cfd44-q8srg 6/6 Running 0 25m
csi-rbdplugin-qtgvt 3/3 Running 0 25m
rook-ceph-crashcollector-master-7bcf565ddc-4mvmk 1/1 Running 0 20m
rook-ceph-crashcollector-node1-7bfc99f96d-2jw4w 1/1 Running 0 20m
rook-ceph-crashcollector-node2-678f85bdf-qw2gq 1/1 Running 0 20m
rook-ceph-mgr-a-574b6956fd-fzt5q 1/1 Running 0 20m
rook-ceph-mon-a-668b48987f-g5zfw 1/1 Running 0 25m
rook-ceph-mon-b-54996b7487-6qscc 1/1 Running 0 24m
rook-ceph-mon-c-6cc5bd5c85-wsrn9 1/1 Running 0 22m
rook-ceph-operator-75dd789779-8kq7z 1/1 Running 0 30m
rook-ceph-osd-0-849c84cc87-bzpf9 1/1 Running 0 20m
rook-ceph-osd-1-77cfc975bb-hbdnn 1/1 Running 0 20m
rook-ceph-osd-2-5c7d59d74d-g67fz 1/1 Running 0 20m
rook-ceph-osd-prepare-master-98nld 0/1 Completed 0 20m
rook-ceph-osd-prepare-node1-nvqvg 0/1 Completed 0 20m
rook-ceph-osd-prepare-node2-x6cnk 0/1 Completed 0 20m
[root@master examples]# kubectl get service -n rook-ceph
NAME TYPE CLUSTER-IP EXTERNAL-IP PORT(S) AGE
csi-cephfsplugin-metrics ClusterIP 10.1.101.105 <none> 8080/TCP,8081/TCP 26m
csi-rbdplugin-metrics ClusterIP 10.1.238.71 <none> 8080/TCP,8081/TCP 26m
rook-ceph-mgr ClusterIP 10.1.98.179 <none> 9283/TCP 21m
rook-ceph-mgr-dashboard ClusterIP 10.1.251.161 <none> 8443/TCP 21m
rook-ceph-mon-a ClusterIP 10.1.0.149 <none> 6789/TCP,3300/TCP 26m
rook-ceph-mon-b ClusterIP 10.1.42.253 <none> 6789/TCP,3300/TCP 25m
rook-ceph-mon-c ClusterIP 10.1.99.90 <none> 6789/TCP,3300/TCP 24m
|
<1>. 三个节点rook-ceph-osd-prepare的正常状态为Completed
<2>. 如果其中一个为Running或缺少rook-ceph-osd节点,注意检查异常节点的时间,防火墙,内存使用情况等。
<3>. 部署Toolbox工具
上面的dashboard是cluster IP集群内部访问,如果想在外部访问,可部署NodePort类型Dashboard,好在rook项目已经写好了,直接使用即可。
 1
 2
 3
 4
 5
 6
 7
 8
 9
10
11
12
13
14
15
| [root@master examples]# cd /root/rook/deploy/examples
[root@master examples]#
[root@master examples]# kubectl apply -f dashboard-external-https.yaml
service/rook-ceph-mgr-dashboard-external-https created
[root@master examples]# kubectl get service -n rook-ceph
NAME TYPE CLUSTER-IP EXTERNAL-IP PORT(S) AGE
csi-cephfsplugin-metrics ClusterIP 10.1.101.105 <none> 8080/TCP,8081/TCP 31m
csi-rbdplugin-metrics ClusterIP 10.1.238.71 <none> 8080/TCP,8081/TCP 31m
rook-ceph-mgr ClusterIP 10.1.98.179 <none> 9283/TCP 26m
rook-ceph-mgr-dashboard ClusterIP 10.1.251.161 <none> 8443/TCP 26m
rook-ceph-mgr-dashboard-external-https NodePort 10.1.182.240 <none> 8443:30301/TCP 35s
rook-ceph-mon-a ClusterIP 10.1.0.149 <none> 6789/TCP,3300/TCP 31m
rook-ceph-mon-b ClusterIP 10.1.42.253 <none> 6789/TCP,3300/TCP 30m
rook-ceph-mon-c ClusterIP 10.1.99.90 <none> 6789/TCP,3300/TCP 28m
[root@master examples]#
|
已经多出一个30301端口的NodePort类型服务,随便拿一个node的IP访问:https://Node-EIP1:30301,输入用户名和密码即可。
访问dashboard的用户名默认是admin,密码通过如下命令获取:
1
| kubectl -n rook-ceph get secret rook-ceph-dashboard-password -o jsonpath="{['data']['password']}" | base64 --decode && echo
|
部署Ceph toolbox: 默认启动的Ceph集群,是开启Ceph认证的,这样你登陆Ceph组件所在的Pod里,是没法去获取集群状态,以及执行CLI命令,这时需要部署Ceph toolbox,命令如下:
1
2
3
4
5
6
7
| kubectl apply -f toolbox.yaml
#查看是否正常
kubectl -n rook-ceph get pods -o wide | grep ceph-tools
#然后可以登陆该pod后,执行Ceph CLI命令:
kubectl -n rook-ceph exec -it rook-ceph-tools-76c7d559b6-8w7bk bash
#查看集群状态
ceph status
|
rook提供RBD服务,rook可以提供以下3类型的存储:
- Block: Create block storage to be consumed by a pod
- Object: Create an object store that is accessible inside or outside the Kubernetes cluster
- Shared File System: Create a file system to be shared across multiple pods
在提供(Provisioning)块存储之前,需要先创建StorageClass和存储池。K8S需要这两类资源,才能和Rook交互,进而分配持久卷(PV)。
在kubernetes集群里,要提供rbd块设备服务,需要有如下步骤:
1)创建rbd-provisioner pod
- 创建rbd对应的storageclass
- 创建pvc,使用rbd对应的storageclass
- 创建pod使用rbd pvc
- 通过rook创建Ceph Cluster之后,rook自身提供了rbd-provisioner服务,所以我们不需要再部署其provisioner。
- 创建pool和StorageClass
查看storageclass.yaml的配置, vim storageclass.yaml,配置文件中包含了一个名为replicapool的存储池,名为rook-ceph-block的storageClass,运行yaml文件
1
2
3
4
| [root@master ~]#cd rook/deploy/examples/csi/rbd
[root@master rbd]# kubectl apply -f storageclass.yaml
cephblockpool.ceph.rook.io/replicapool created
storageclass.storage.k8s.io/rook-ceph-block created
|
2)查看创建的storageclass:
1
2
3
| [root@master rbd]# kubectl get storageclass
NAME PROVISIONER RECLAIMPOLICY VOLUMEBINDINGMODE ALLOWVOLUMEEXPANSION AGE
rook-ceph-block rook-ceph.rbd.csi.ceph.com Delete Immediate true 2m36s
|
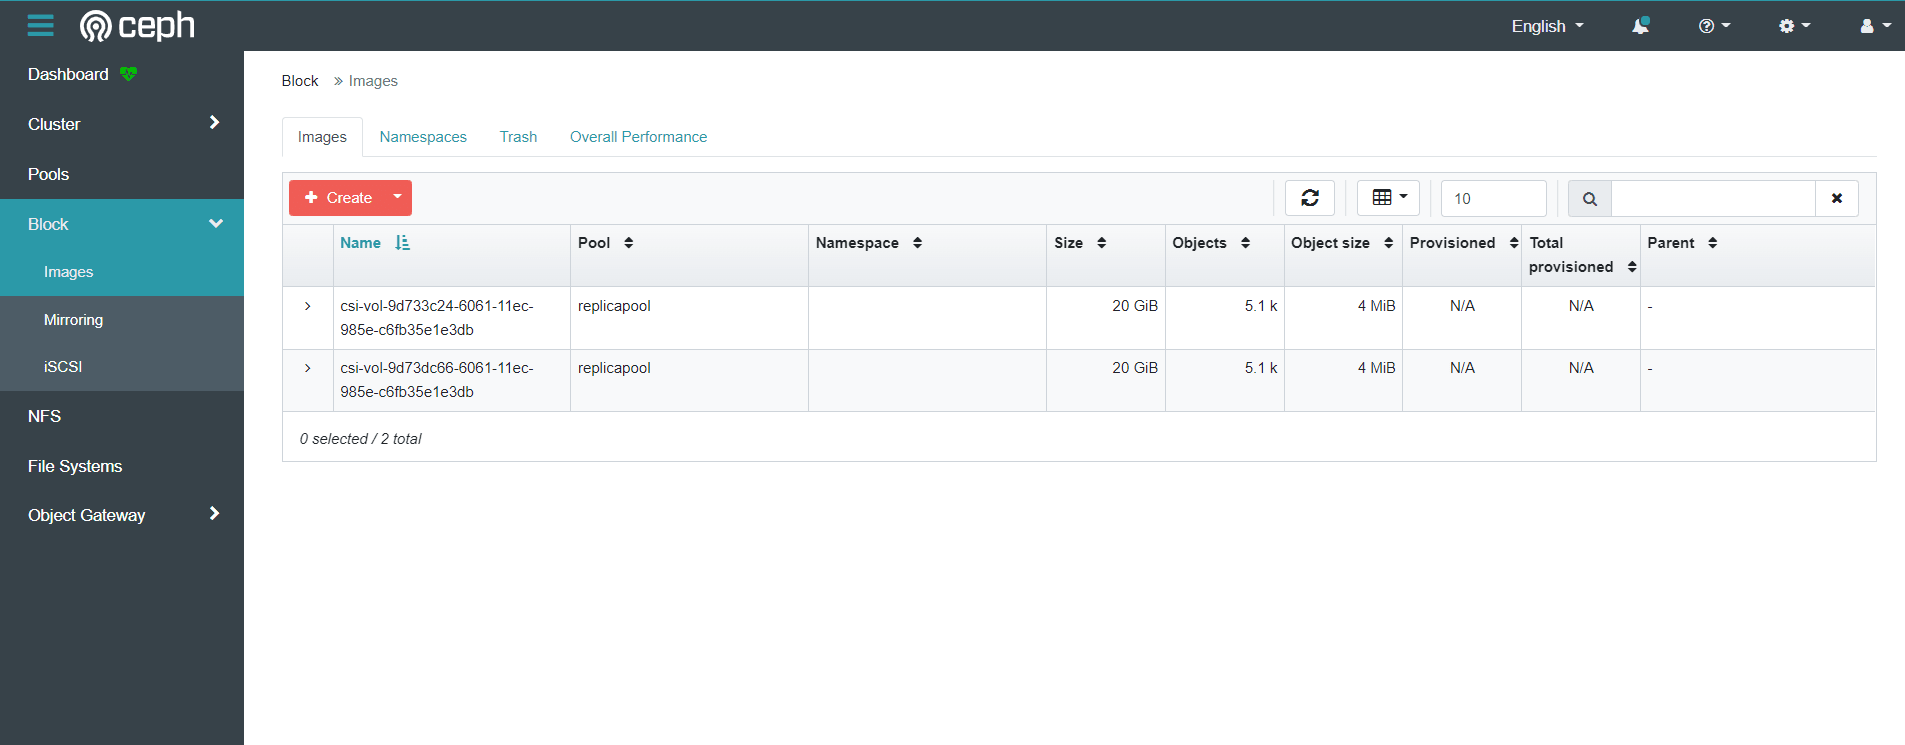
3)登录ceph dashboard查看创建的存储池:
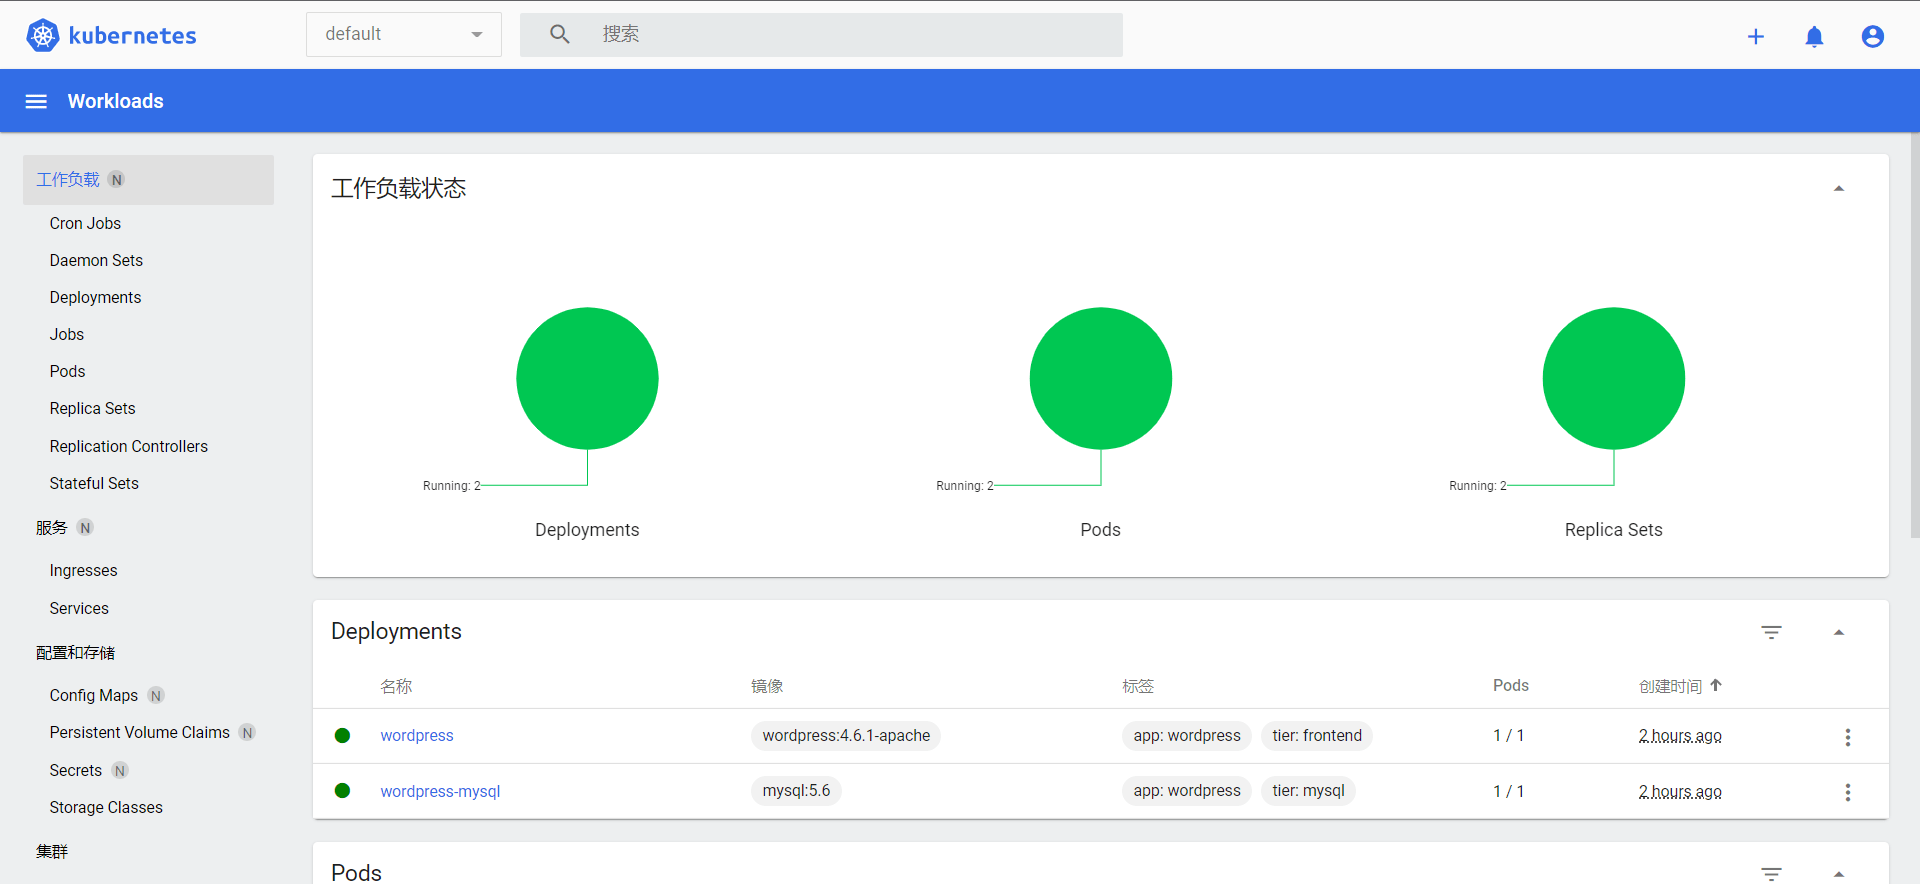
使用存储,以官方服务wordpress示例为例,创建一个经典的wordpress和mysql应用程序来使用Rook提供的块存储,这两个应用程序都将使用Rook提供的block volumes。
查看yaml文件配置,主要看定义的pvc和挂载volume部分,以wordpress.yaml和mysql.yaml为例:
 1
 2
 3
 4
 5
 6
 7
 8
 9
10
11
12
| [root@master ~]# cd rook/deploy/examples/
[root@master examples]# kubectl apply -f wordpress.yaml -f mysql.yaml
service/wordpress created
persistentvolumeclaim/wp-pv-claim created
deployment.apps/wordpress created
service/wordpress-mysql created
persistentvolumeclaim/mysql-pv-claim created
deployment.apps/wordpress-mysql created
[root@master examples]# kubectl get deployments.apps
NAME READY UP-TO-DATE AVAILABLE AGE
wordpress 0/1 1 0 28s
wordpress-mysql 0/1 1 0 28s
|
这2个应用都会创建一个块存储卷,并且挂载到各自的pod中,查看声明的pvc和pv:
1
2
3
4
5
6
7
8
9
| [root@master examples]# kubectl get pvc
NAME STATUS VOLUME CAPACITY ACCESS MODES STORAGECLASS AGE
mysql-pv-claim Bound pvc-cdfbbd11-a22e-4f72-96cd-064e228eb730 20Gi RWO rook-ceph-block 83s
wp-pv-claim Bound pvc-b09ce46e-d00e-4b7d-8303-748bbb7d0944 20Gi RWO rook-ceph-block 83s
[root@master examples]# kubectl get pv
NAME CAPACITY ACCESS MODES RECLAIM POLICY STATUS CLAIM STORAGECLASS REASON AGE
pvc-b09ce46e-d00e-4b7d-8303-748bbb7d0944 20Gi RWO Delete Bound default/wp-pv-claim rook-ceph-block 86s
pvc-cdfbbd11-a22e-4f72-96cd-064e228eb730 20Gi RWO Delete Bound default/mysql-pv-claim rook-ceph-block 86s
[root@master examples]#
|
这里的pv会自动创建,当提交了包含 StorageClass 字段的 PVC 之后,Kubernetes 就会根据这个 StorageClass 创建出对应的 PV,这是用到的是Dynamic Provisioning机制来动态创建pv,PV 支持 Static 静态请求,和动态创建两种方式。
登录ceph dashboard查看创建的images
5.5 安装Dashboard可视化面板
从github获取dashboard源码
1
| wget https://raw.githubusercontent.com/kubernetes/dashboard/v2.4.0/aio/deploy/recommended.yaml
|
为了测试方便,我们将Service改成NodePort类型,注意 在YAML中下面的 Service 部分新增一个type=NodePort:
 1
 2
 3
 4
 5
 6
 7
 8
 9
10
11
12
13
14
| kind: Service
apiVersion: v1
metadata:
labels:
k8s-app: kubernetes-dashboard
name: kubernetes-dashboard
namespace: kubernetes-dashboard
spec:
ports:
- port: 443
targetPort: 8443
type: NodePort
selector:
k8s-app: kubernetes-dashboard
|
默认没有字段type: NodePort,服务类型为cluster IP类型。
然后直接部署新版本的dashboard即可:
 1
 2
 3
 4
 5
 6
 7
 8
 9
10
11
12
13
14
15
16
17
18
19
20
21
22
23
24
25
26
27
| [root@master ~]# kubectl apply -f recommended.yaml
namespace/kubernetes-dashboard created
serviceaccount/kubernetes-dashboard created
service/kubernetes-dashboard created
secret/kubernetes-dashboard-certs created
secret/kubernetes-dashboard-csrf created
secret/kubernetes-dashboard-key-holder created
configmap/kubernetes-dashboard-settings created
role.rbac.authorization.k8s.io/kubernetes-dashboard created
clusterrole.rbac.authorization.k8s.io/kubernetes-dashboard created
rolebinding.rbac.authorization.k8s.io/kubernetes-dashboard created
clusterrolebinding.rbac.authorization.k8s.io/kubernetes-dashboard created
deployment.apps/kubernetes-dashboard created
service/dashboard-metrics-scraper created
deployment.apps/dashboard-metrics-scraper created
[root@master ~]# kubectl get ns
NAME STATUS AGE
default Active 50m
kube-node-lease Active 50m
kube-public Active 50m
kube-system Active 50m
kubernetes-dashboard Active 11s
rook-ceph Active 46m
[root@master ~]# kubectl get svc -nkubernetes-dashboard
NAME TYPE CLUSTER-IP EXTERNAL-IP PORT(S) AGE
dashboard-metrics-scraper ClusterIP 10.1.213.171 <none> 8000/TCP 32s
kubernetes-dashboard NodePort 10.1.221.14 <none> 443:31712/TCP 32s
|
其中NodePort为31712,随意组合一个Node节点IP即可访问。https://NodeIP:31712, 由于在华为云外网无法直接访问VPC内部IP地址,所以需要使用外部EIP访问,EIP会隐射到内部Node节点IP上去。
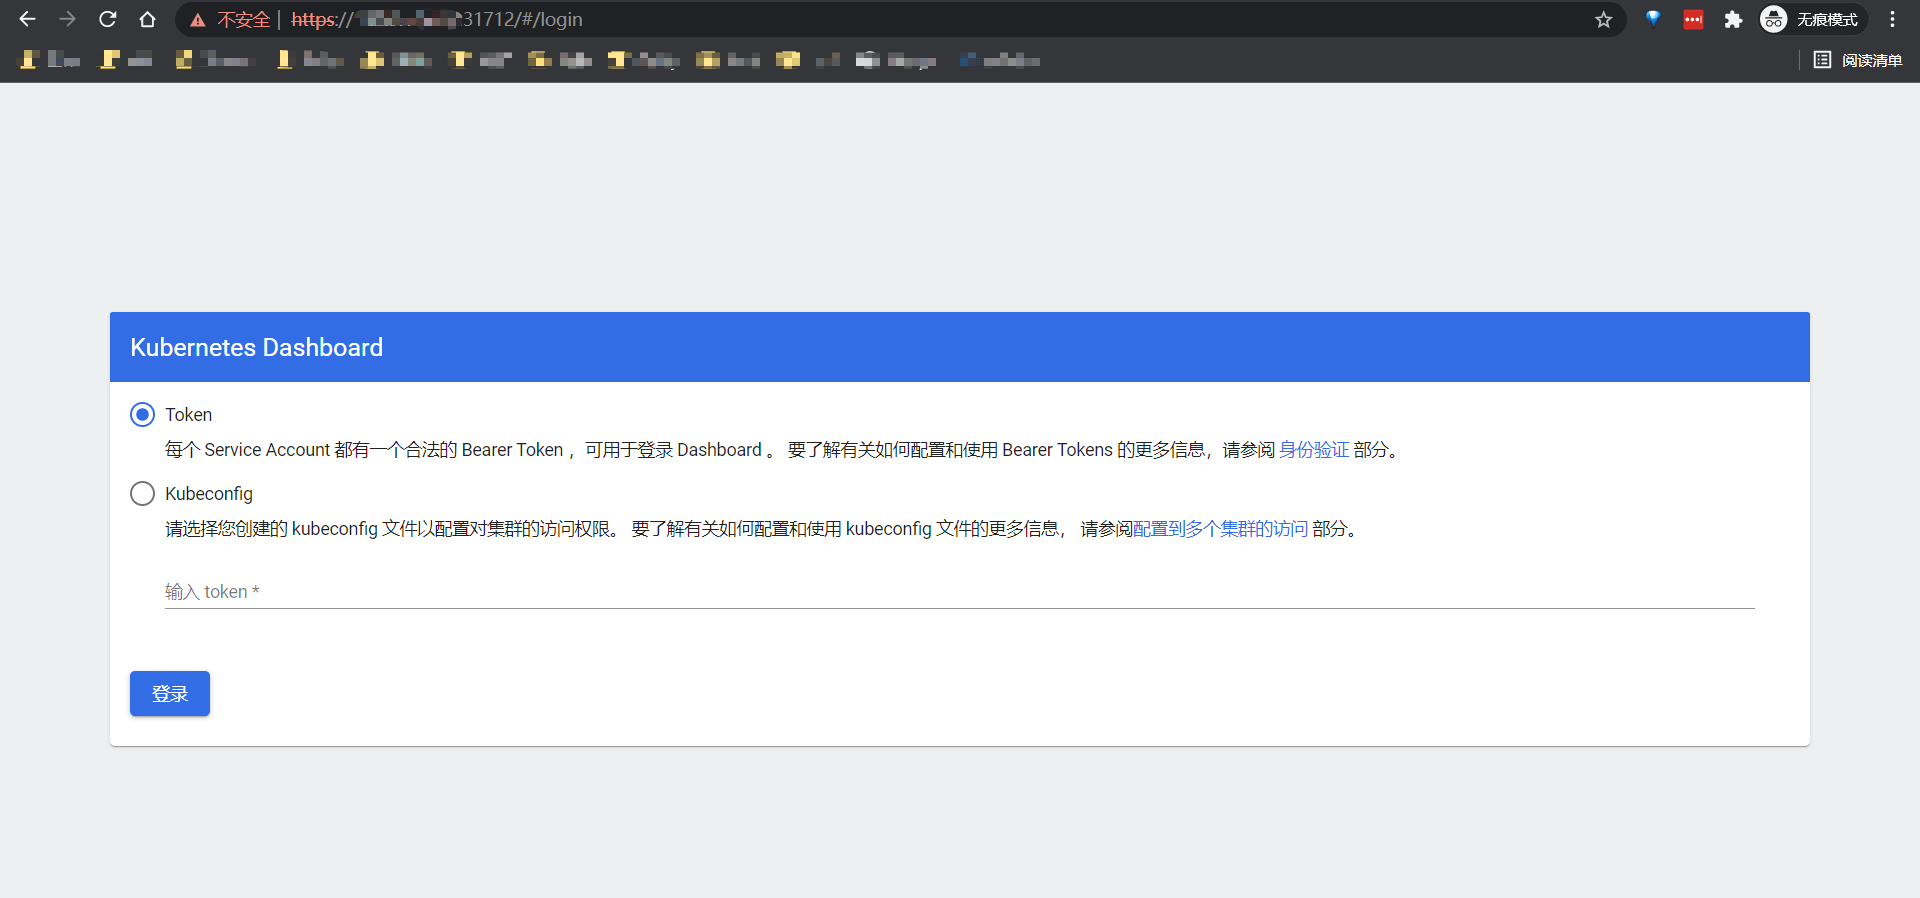
这个时候需要使用Token或者Kubeconfig来登陆。
1
2
3
| kubectl create serviceaccount dashboard-admin -n kube-system
kubectl create clusterrolebinding dashboard-admin --clusterrole=cluster-admin --serviceaccount=kube-system:dashboard-admin
kubectl describe secrets -n kube-system $(kubectl -n kube-system get secret | awk '/dashboard-admin/{print $1}')
|
示例一下Token:
 1
 2
 3
 4
 5
 6
 7
 8
 9
10
11
12
13
14
| [root@master ~]# kubectl describe secrets -n kube-system $(kubectl -n kube-system get secret | awk '/dashboard-admin/{print $1}')
Name: dashboard-admin-token-thf6q
Namespace: kube-system
Labels: <none>
Annotations: kubernetes.io/service-account.name: dashboard-admin
kubernetes.io/service-account.uid: d6ea3599-19c6-48a9-aa3b-2ec7ce265a24
Type: kubernetes.io/service-account-token
Data
====
token: eyJhbGciOiJSUzI1NiIsImtpZCI6ImJQRzl4aF9wMFdRbWE2blp0b1JvN2dVNWhkRkdZVzRpMndLMnhJbks5S00ifQ.eyJpc3MiOiJrdWJlcm5ldGVzL3NlcnZpY2VhY2NvdW50Iiwia3ViZXJuZXRlcy5pby9zZXJ2aWNlYWNjb3VudC9uYW1lc3BhY2UiOiJrdWJlLXN5c3RlbSIsImt1YmVybmV0ZXMuaW8vc2VydmljZWFjY291bnQvc2VjcmV0Lm5hbWUiOiJkYXNoYm9hcmQtYWRtaW4tdG9rZW4tdGhmNnEiLCJrdWJlcm5ldGVzLmlvL3NlcnZpY2VhY2NvdW50L3NlcnZpY2UtYWNjb3VudC5uYW1lIjoiZGFzaGJvYXJkLWFkbWluIiwia3ViZXJuZXRlcy5pby9zZXJ2aWNlYWNjb3VudC9zZXJ2aWNlLWFjY291bnQudWlkIjoiZDZlYTM1OTktMTljNi00OGE5LWFhM2ItMmVjN2NlMjY1YTI0Iiwic3ViIjoic3lzdGVtOnNlcnZpY2VhY2NvdW50Omt1YmUtc3lzdGVtOmRhc2hib2FyZC1hZG1pbiJ9.PlaEmz10kVjQf1zxUSNfiGytP0Ha6hCLuk2fBFM08owjEaFcIWHdRVRsHL6RO0w0i81YG0Gh6x3zJffy_ojhi_M-bCaPSVubPFrZz-CYO7Uia4fYv1P8f5c6I2X1e_-K2DzCYUlJvI3nzZy-jrFMIz_W19k63rRbxeNrqkdBJpsheWmaT_g8fjAzjtCDEnYUGDDPTVOtEvuhaSC_yci42f7eqTtlR2_QK1Bg2Id0GIEtEXT3xBgaofWuyjJVEex1mc4LImsdzpVFMtmPum9vEoZzxq1EONhOWxaaFIaadstfM-id9vDNlvZ5O2szk5xVtdgryFi72ICX7x5EpPyOqw
ca.crt: 1099 bytes
namespace: 11 bytes
|
可以拿上面的token直接登陆,另也可以使用config文件也可以登录Dashboard。
生成kubeconfig文件
1
2
3
4
5
6
7
8
9
| DASH_TOCKEN=$(kubectl get secret -n kube-system dashboard-admin-token-thf6q -o jsonpath={.data.token}|base64 -d)
#其中的 dashboard-admin-token-thf6q为上面生成的token名
kubectl config set-cluster kubernetes --server=192.168.0.11:6443 --kubeconfig=/root/dashbord-admin.conf
#其中server地址为API-server地址
kubectl config set-credentials dashboard-admin --token=$DASH_TOCKEN --kubeconfig=/root/dashbord-admin.conf
kubectl config set-context dashboard-admin@kubernetes --cluster=kubernetes --user=dashboard-admin --kubeconfig=/root/dashbord-admin.conf
kubectl config use-context dashboard-admin@kubernetes --kubeconfig=/root/dashbord-admin.conf
|
生成的dashbord-admin.conf即可用于登录Dashboard。
全文完。